使用 RedwoodJS 构建用户管理应用
如果在学习本指南时遇到困难,请参考GitHub上的完整示例。
关于 RedwoodJS
Redwood 应用程序分为两部分:前端和后端。这表现为单一 monorepo 中的两个 Node 项目。
前端项目称为 web,后端项目称为 api。为明确起见,我们将在文档中将它们称为 "端",即 web 端 和 api 端。
它们是独立的项目,因为 web 端 的代码最终会在用户的浏览器中运行,而 api 端 的代码将在服务器上运行。
重要说明:本指南中提到的 "API" 指 Supabase API,而 api 端 则指 RedwoodJS 的 api 端。
api 端 是 GraphQL API 的实现。业务逻辑被组织成"服务",这些服务代表它们自己的内部 API,既可以从外部 GraphQL 请求调用,也可以被其他内部服务调用。
web 端 使用 React 构建。Redwood 的路由器可以简单地将 URL 路径映射到 React 的"页面"组件(并自动为每个路由进行代码分割)。
页面可能包含一个"布局"组件来包裹内容。它们还包含"单元格"和常规 React 组件。
单元格允许您以声明式管理获取和显示数据的组件生命周期。
为了与其他框架教程保持一致,我们将以不同于常规的方式构建此应用。
我们 不会使用 Prisma 连接 Supabase Postgres 数据库或使用 Prisma 迁移,而这通常在 Redwood 应用中很常见。
相反,我们将依赖 Supabase 客户端在 web 端完成部分工作,并在 api 端再次使用客户端进行数据获取。
这意味着您需要避免运行任何 yarn rw prisma migrate 命令,并在部署时仔细检查构建命令以确保 Prisma 不会重置您的数据库。由于 Prisma 目前不支持跨模式外键,当 Supabase 的 public 模式引用 auth.users 时,模式自省会失败。
项目设置
在开始构建之前,我们需要设置数据库和 API。这就像在 Supabase 中创建一个新项目,然后在数据库中创建一个 “模式” 一样简单。
创建项目
- 在 Supabase 仪表板中创建一个新项目。
- 输入项目详细信息。
- 等待新数据库启动。
设置数据库模式
现在我们要设置数据库模式。我们可以在 SQL 编辑器中使用 “用户管理入门” 快速启动模板,或者您也可以直接复制/粘贴下面的 SQL 并自行运行。
获取 API 密钥
既然您已经创建了一些数据库表,就可以使用自动生成的 API 插入数据了。
我们只需要从 API 设置中获取项目 URL 和 anon 密钥。
- 前往仪表板中的 API 设置 页面。
- 在该页面找到您的项目
URL、anon和service_role密钥。
构建应用
让我们从零开始构建 RedwoodJS 应用。
RedwoodJS 需要 Node.js 版本 >= 14.x <= 16.x 和 Yarn 版本 >= 1.15。
请确保已安装 Yarn,因为 RedwoodJS 依赖它来管理工作区中的包,以管理其 web 和 api "两端"。
初始化 RedwoodJS 应用
我们可以使用 Create Redwood App 命令来初始化一个名为 supabase-redwoodjs 的应用:
12yarn create redwood-app supabase-redwoodjscd supabase-redwoodjs应用安装过程中,您会看到:
123456789✔ 创建 Redwood 应用 ✔ 检查 node 和 yarn 兼容性 ✔ 创建目录 'supabase-redwoodjs'✔ 安装依赖包 ✔ 运行 'yarn install'... (这可能需要一些时间)✔ 将 TypeScript 文件转换为 JavaScript✔ 生成类型定义感谢试用 Redwood!然后让我们通过运行 setup auth 命令安装唯一的额外依赖 supabase-js:
1yarn redwood setup auth supabase当提示:
覆盖现有的 /api/src/lib/auth.[jt]s 文件?
选择 是,这将在您的应用中设置 Supabase 客户端,并提供与 Supabase 身份验证一起使用的钩子。
12345678910✔ 生成 auth 库... ✔ 成功写入文件 `./api/src/lib/auth.js` ✔ 添加 auth 配置到 web... ✔ 添加 auth 配置到 GraphQL API... ✔ 添加所需的 web 包... ✔ 安装依赖包... ✔ 还有一件事... 您需要将 Supabase URL (SUPABASE_URL)、公共 API KEY 和 JWT 密钥 (SUPABASE_KEY 和 SUPABASE_JWT_SECRET) 添加到您的 .env 文件中。接下来,我们需要将环境变量保存到 .env 文件中。
需要用到之前获取的 API URL 以及 anon 和 jwt_secret 密钥。
123SUPABASE_URL=YOUR_SUPABASE_URLSUPABASE_KEY=YOUR_SUPABASE_ANON_KEYSUPABASE_JWT_SECRET=YOUR_SUPABASE_JWT_SECRET最后,您还需要仅将 web 端的环境变量保存到 redwood.toml 文件中。
123456789[web] title = "Supabase Redwood 教程" port = 8910 apiProxyPath = "/.redwood/functions" includeEnvironmentVariables = ["SUPABASE_URL", "SUPABASE_KEY"][api] port = 8911[browser] open = true这些变量将在浏览器中公开,这完全没问题。 它们允许您的 web 应用使用公共匿名密钥初始化 Supabase 客户端,因为我们的数据库已启用行级安全。
您可以在 web/src/App.js 中看到这些变量被用于配置 Supabase 客户端:
123456789101112131415161718192021// ... Redwood 导入import { AuthProvider } from '@redwoodjs/auth'import { createClient } from '@supabase/supabase-js'// ...const supabase = createClient(process.env.SUPABASE_URL, process.env.SUPABASE_KEY)const App = () => ( <FatalErrorBoundary page={FatalErrorPage}> <RedwoodProvider titleTemplate="%PageTitle | %AppTitle"> <AuthProvider client={supabase} type="supabase"> <RedwoodApolloProvider> <Routes /> </RedwoodApolloProvider> </AuthProvider> </RedwoodProvider> </FatalErrorBoundary>)export default App应用样式(可选)
可选步骤是更新 CSS 文件 web/src/index.css 来美化应用外观。
您可以在这里找到该文件的完整内容。
启动 RedwoodJS 并创建首个页面
让我们通过启动应用来测试当前配置:
1yarn rw devrw 是 redwood 的别名,例如 yarn rw 用于运行 Redwood CLI 命令。
您应该会看到"Welcome to RedwoodJS"页面和关于尚未创建任何页面的提示。
现在,让我们创建一个"home"页面:
12345678yarn rw generate page home /✔ 生成页面文件中... ✔ 成功写入文件 `./web/src/pages/HomePage/HomePage.stories.js` ✔ 成功写入文件 `./web/src/pages/HomePage/HomePage.test.js` ✔ 成功写入文件 `./web/src/pages/HomePage/HomePage.js`✔ 更新路由文件中...✔ 生成类型定义中...这里的 / 很重要,它会创建一个根级路由。
如果需要,您可以停止 dev 服务器;要查看更改,只需确保再次运行 yarn rw dev。
您应该在 web/src/Routes.js 中看到 Home 页面路由:
123456789101112import { Router, Route } from '@redwoodjs/router'const Routes = () => { return ( <Router> <Route path="/" page={HomePage} name="home" /> <Route notfound page={NotFoundPage} /> </Router> )}export default Routes设置登录组件
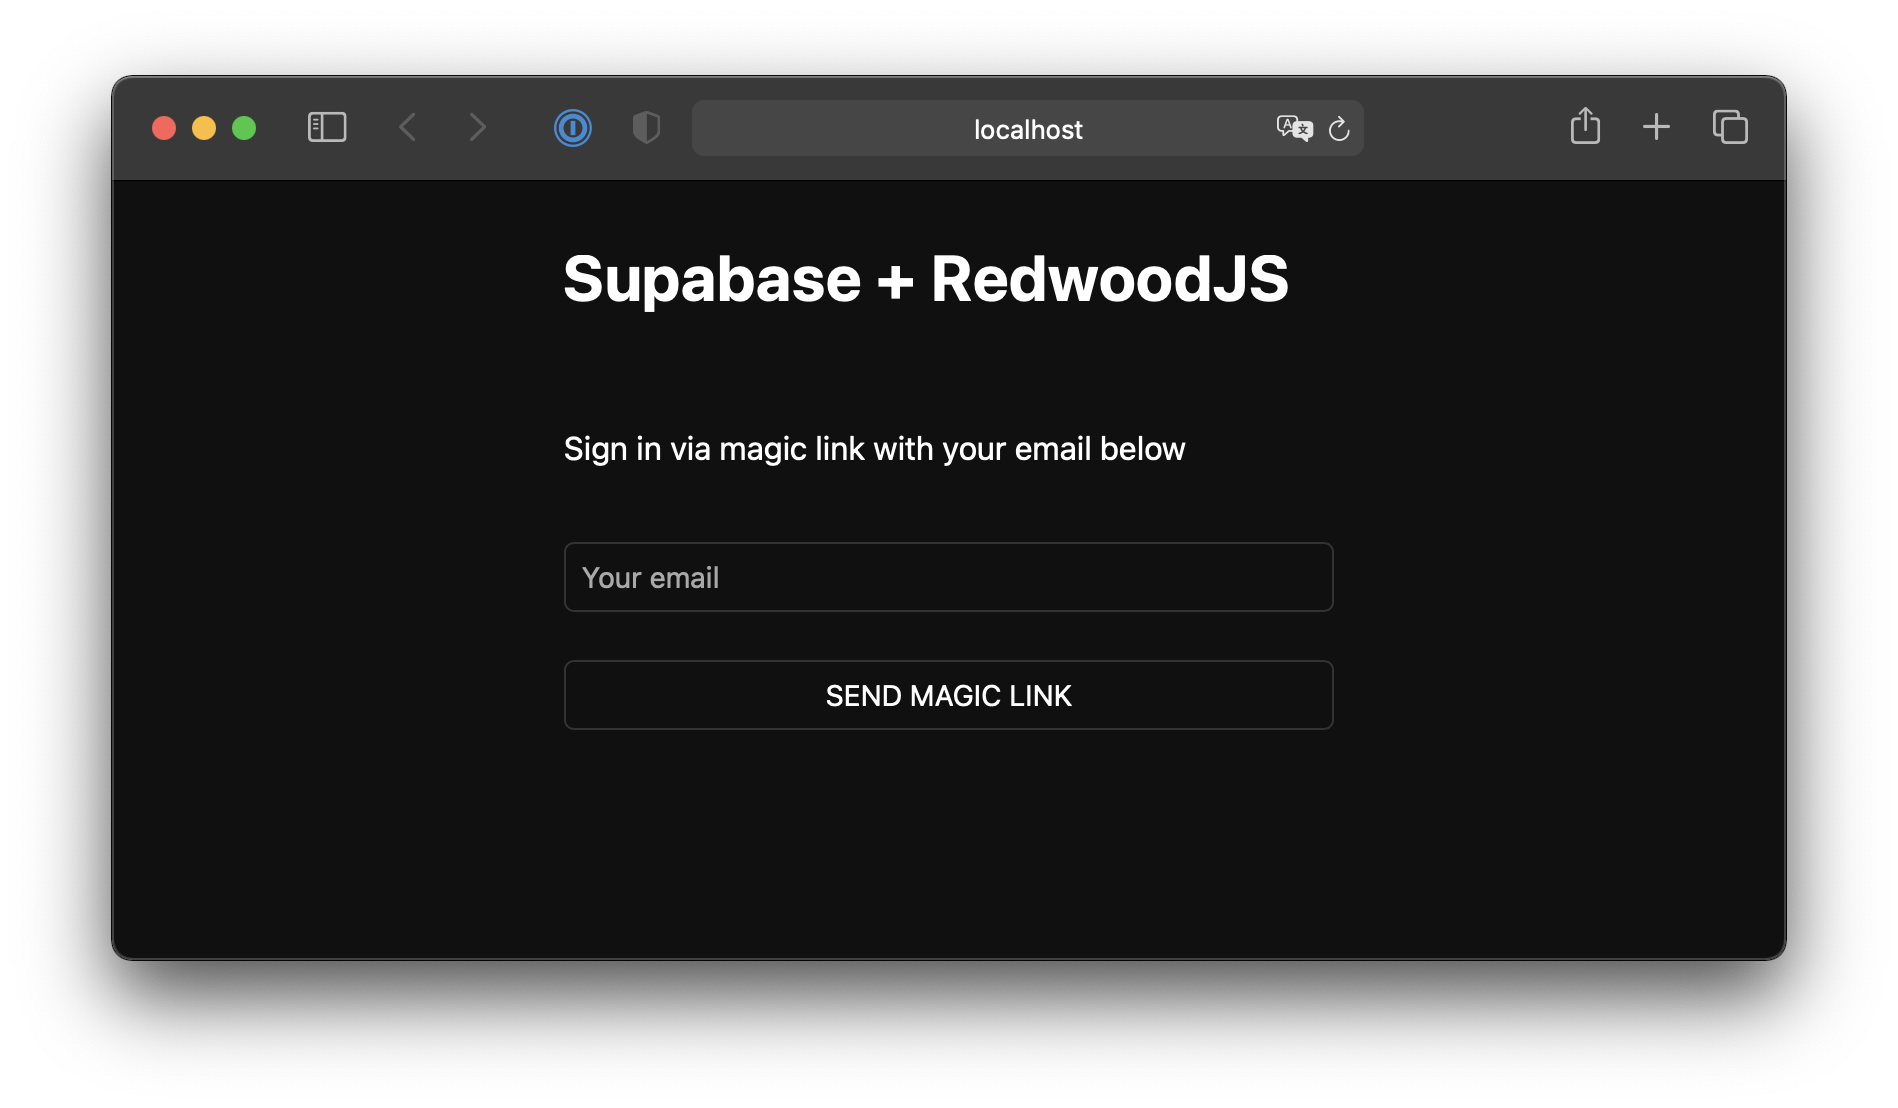
让我们创建一个Redwood组件来管理登录和注册功能。我们将使用Magic Links(魔法链接)方式,让用户无需密码即可通过邮箱登录。
123456yarn rw g component auth ✔ 生成组件文件中... ✔ 成功写入文件 `./web/src/components/Auth/Auth.test.js` ✔ 成功写入文件 `./web/src/components/Auth/Auth.stories.js` ✔ 成功写入文件 `./web/src/components/Auth/Auth.js`现在,更新Auth.js组件内容如下:
1234567891011121314151617181920212223242526272829303132333435363738394041424344454647484950515253import { useState } from 'react'import { useAuth } from '@redwoodjs/auth'const Auth = () => { const { logIn } = useAuth() const [loading, setLoading] = useState(false) const [email, setEmail] = useState('') const handleLogin = async (email) => { try { setLoading(true) const { error } = await logIn({ email }) if (error) throw error alert('请查看您的邮箱获取登录链接!') } catch (error) { alert(error.error_description || error.message) } finally { setLoading(false) } } return ( <div className="row flex-center flex"> <div className="col-6 form-widget"> <h1 className="header">Supabase + RedwoodJS</h1> <p className="description">通过下方邮箱接收魔法链接登录</p> <div> <input className="inputField" type="email" placeholder="您的邮箱" value={email} onChange={(e) => setEmail(e.target.value)} /> </div> <div> <button onClick={(e) => { e.preventDefault() handleLogin(email) }} className={'button block'} disabled={loading} > {loading ? <span>加载中</span> : <span>发送魔法链接</span>} </button> </div> </div> </div> )}export default Auth设置账户组件
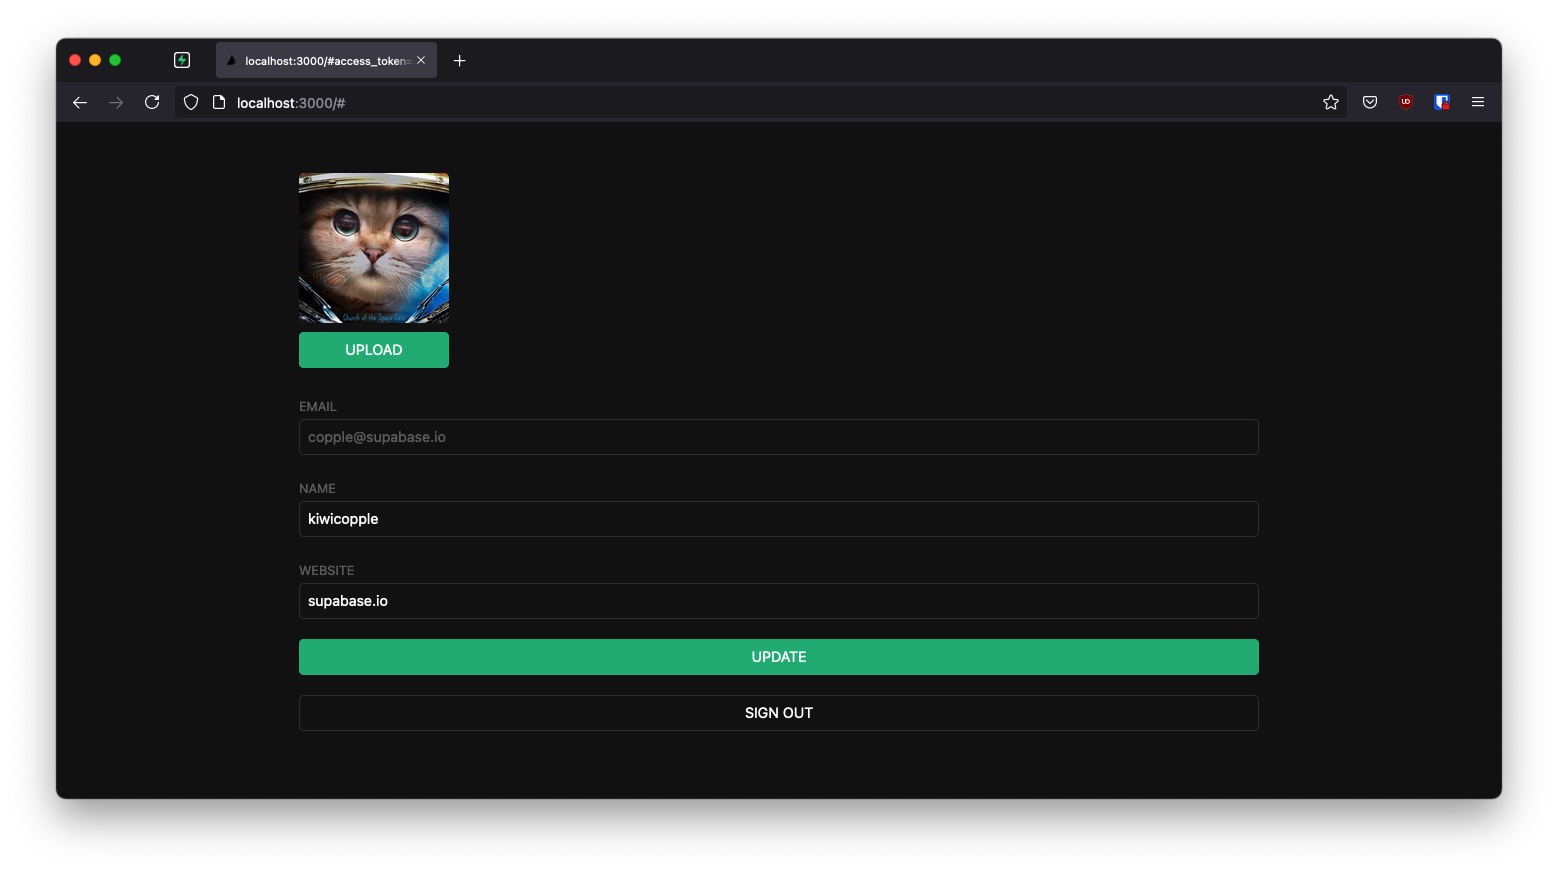
用户登录后,我们可以允许他们编辑个人资料信息和管理账户。
让我们创建一个名为 Account.js 的新组件。
123456yarn rw g component account ✔ 生成组件文件中... ✔ 成功写入文件 `./web/src/components/Account/Account.test.js` ✔ 成功写入文件 `./web/src/components/Account/Account.stories.js` ✔ 成功写入文件 `./web/src/components/Account/Account.js`然后更新文件内容如下:
123456789101112131415161718192021222324252627282930313233343536373839404142434445464748495051525354555657585960616263646566676869707172737475767778798081828384858687888990919293949596979899100101102103104105106107108109110111112113114115116117118119120121import { useState, useEffect } from 'react'import { useAuth } from '@redwoodjs/auth'const Account = () => { const { client: supabase, currentUser, logOut } = useAuth() const [loading, setLoading] = useState(true) const [username, setUsername] = useState(null) const [website, setWebsite] = useState(null) const [avatar_url, setAvatarUrl] = useState(null) useEffect(() => { getProfile() }, [supabase.auth.session]) async function getProfile() { try { setLoading(true) const user = supabase.auth.user() const { data, error, status } = await supabase .from('profiles') .select(`username, website, avatar_url`) .eq('id', user.id) .single() if (error && status !== 406) { throw error } if (data) { setUsername(data.username) setWebsite(data.website) setAvatarUrl(data.avatar_url) } } catch (error) { alert(error.message) } finally { setLoading(false) } } async function updateProfile({ username, website, avatar_url }) { try { setLoading(true) const user = supabase.auth.user() const updates = { id: user.id, username, website, avatar_url, updated_at: new Date(), } const { error } = await supabase.from('profiles').upsert(updates, { returning: 'minimal', // 插入后不返回值 }) if (error) { throw error } alert('个人资料已更新!') } catch (error) { alert(error.message) } finally { setLoading(false) } } return ( <div className="row flex-center flex"> <div className="col-6 form-widget"> <h1 className="header">Supabase + RedwoodJS</h1> <p className="description">您的个人资料</p> <div className="form-widget"> <div> <label htmlFor="email">邮箱</label> <input id="email" type="text" value={currentUser.email} disabled /> </div> <div> <label htmlFor="username">姓名</label> <input id="username" type="text" value={username || ''} onChange={(e) => setUsername(e.target.value)} /> </div> <div> <label htmlFor="website">网站</label> <input id="website" type="url" value={website || ''} onChange={(e) => setWebsite(e.target.value)} /> </div> <div> <button className="button primary block" onClick={() => updateProfile({ username, website, avatar_url })} disabled={loading} > {loading ? '加载中...' : '更新'} </button> </div> <div> <button className="button block" onClick={() => logOut()}> 退出登录 </button> </div> </div> </div> </div> )}export default Account您会多次看到 useAuth() 的使用。Redwood 的 useAuth 钩子提供了便捷的方式来访问 logIn、logOut、currentUser 以及获取 supabase 认证客户端。我们将使用它来获取 Supabase 客户端实例以与您的 API 交互。
更新首页
现在我们已经准备好了所有组件,让我们更新您的 HomePage 页面来使用它们:
123456789101112131415161718import { useAuth } from '@redwoodjs/auth'import { MetaTags } from '@redwoodjs/web'import Account from 'src/components/Account'import Auth from 'src/components/Auth'const HomePage = () => { const { isAuthenticated } = useAuth() return ( <> <MetaTags title="Welcome" /> {!isAuthenticated ? <Auth /> : <Account />} </> )}export default HomePage我们在这里实现的功能是:如果用户未登录则显示登录表单,已登录则显示账户资料。
启动!
完成上述步骤后,在终端窗口运行以下命令启动开发服务器:
1yarn rw dev然后在浏览器中打开 localhost:8910,您应该能看到完整的应用程序。
附加功能:个人头像
每个 Supabase 项目都配置了存储功能,用于管理照片和视频等大型文件。
创建上传组件
让我们为用户创建一个头像上传组件,使他们能够上传个人资料照片。我们可以从创建一个新组件开始:
12345yarn rw g component avatar ✔ 生成组件文件... ✔ 成功写入文件 `./web/src/components/Avatar/Avatar.test.js` ✔ 成功写入文件 `./web/src/components/Avatar/Avatar.stories.js` ✔ 成功写入文件 `./web/src/components/Avatar/Avatar.js`现在,更新您的 Avatar 组件以包含以下上传控件:
1234567891011121314151617181920212223242526272829303132333435363738394041424344454647484950515253545556575859606162636465666768697071727374757677787980818283848586import { useEffect, useState } from 'react'import { useAuth } from '@redwoodjs/auth'const Avatar = ({ url, size, onUpload }) => { const { client: supabase } = useAuth() const [avatarUrl, setAvatarUrl] = useState(null) const [uploading, setUploading] = useState(false) useEffect(() => { if (url) downloadImage(url) }, [url]) async function downloadImage(path) { try { const { data, error } = await supabase.storage.from('avatars').download(path) if (error) { throw error } const url = URL.createObjectURL(data) setAvatarUrl(url) } catch (error) { console.log('下载图片错误: ', error.message) } } async function uploadAvatar(event) { try { setUploading(true) if (!event.target.files || event.target.files.length === 0) { throw new Error('请选择要上传的图片') } const file = event.target.files[0] const fileExt = file.name.split('.').pop() const fileName = `${Math.random()}.${fileExt}` const filePath = `${fileName}` const { error: uploadError } = await supabase.storage.from('avatars').upload(filePath, file) if (uploadError) { throw uploadError } onUpload(filePath) } catch (error) { alert(error.message) } finally { setUploading(false) } } return ( <div> {avatarUrl ? ( <img src={avatarUrl} alt="用户头像" className="avatar image" style={{ height: size, width: size }} /> ) : ( <div className="avatar no-image" style={{ height: size, width: size }} /> )} <div style={{ width: size }}> <label className="button primary block" htmlFor="single"> {uploading ? '上传中...' : '上传'} </label> <input style={{ visibility: 'hidden', position: 'absolute', }} type="file" id="single" accept="image/*" onChange={uploadAvatar} disabled={uploading} /> </div> </div> )}export default Avatar添加新组件
然后我们可以将这个组件添加到 Account 组件中:
12345678910111213141516171819// 导入新组件import Avatar from 'src/components/Avatar'// ...return ( <div className="form-widget"> {/* 添加到主体部分 */} <Avatar url={avatar_url} size={150} onUpload={(url) => { setAvatarUrl(url) updateProfile({ username, website, avatar_url: url }) }} /> {/* ... */} </div>)至此,您已经拥有了一个功能完整的应用程序!
相关阅读
- 了解更多关于 RedwoodJS 的信息
- 访问 RedwoodJS 社区论坛