使用 Swift 和 SwiftUI 构建用户管理应用
本教程展示如何构建一个基本的用户管理应用程序。该应用程序对用户进行身份验证和识别,将其个人资料信息存储在数据库中,并允许用户登录、更新个人资料详细信息以及上传个人资料照片。该应用程序使用:
- Supabase数据库 - 一个Postgres数据库,用于存储用户数据,并通过行级安全性来保护数据,确保用户只能访问自己的信息。
- Supabase身份验证 - 允许用户注册和登录。
- Supabase存储 - 用户可以上传个人资料照片。
如果在学习本指南时遇到问题,请参考GitHub上的完整示例。
项目设置
在开始构建之前,我们需要设置数据库和 API。这就像在 Supabase 中创建一个新项目,然后在数据库中创建一个 “模式” 一样简单。
创建项目
- 在 Supabase 仪表板中创建一个新项目。
- 输入项目详细信息。
- 等待新数据库启动。
设置数据库模式
现在我们要设置数据库模式。我们可以在 SQL 编辑器中使用 “用户管理入门” 快速启动模板,或者您也可以直接复制/粘贴下面的 SQL 并自行运行。
获取 API 密钥
既然您已经创建了一些数据库表,就可以使用自动生成的 API 插入数据了。
我们只需要从 API 设置中获取项目 URL 和 anon 密钥。
- 前往仪表板中的 API 设置 页面。
- 在该页面找到您的项目
URL、anon和service_role密钥。
构建应用
让我们从零开始构建一个SwiftUI应用。
在Xcode中创建SwiftUI应用
打开Xcode并创建一个新的SwiftUI项目。
添加supabase-swift依赖项。
将https://github.com/supabase/supabase-swift包添加到您的应用中。具体操作说明请参阅Apple关于添加包依赖项的教程。
创建一个辅助文件来初始化Supabase客户端。
您需要之前复制的API URL和anon密钥。
这些变量将在应用程序中公开,这完全没有问题,因为您的数据库已启用
行级安全。
1234567import Foundationimport Supabaselet supabase = SupabaseClient( supabaseURL: URL(string: "YOUR_SUPABASE_URL")!, supabaseKey: "YOUR_SUPABASE_ANON_KEY")设置登录视图
设置一个 SwiftUI 视图来管理登录和注册功能。 用户应该能够通过魔法链接进行登录。
123456789101112131415161718192021222324252627282930313233343536373839404142434445464748495051525354555657585960616263646566import SwiftUIimport Supabasestruct AuthView: View { @State var email = "" @State var isLoading = false @State var result: Result<Void, Error>? var body: some View { Form { Section { TextField("Email", text: $email) .textContentType(.emailAddress) .textInputAutocapitalization(.never) .autocorrectionDisabled() } Section { Button("Sign in") { signInButtonTapped() } if isLoading { ProgressView() } } if let result { Section { switch result { case .success: Text("Check your inbox.") case .failure(let error): Text(error.localizedDescription).foregroundStyle(.red) } } } } .onOpenURL(perform: { url in Task { do { try await supabase.auth.session(from: url) } catch { self.result = .failure(error) } } }) } func signInButtonTapped() { Task { isLoading = true defer { isLoading = false } do { try await supabase.auth.signInWithOTP( email: email, redirectTo: URL(string: "io.supabase.user-management://login-callback") ) result = .success(()) } catch { result = .failure(error) } } }}示例中使用了自定义的 redirectTo URL。要使此功能正常工作,您需要:
- 在 Supabase 中添加自定义重定向 URL
- 在 SwiftUI 应用中添加自定义 URL scheme 请按照实现深度链接处理指南进行操作。
账户视图
用户登录后,您可以允许他们编辑个人资料信息并管理账户。
为此创建一个名为 ProfileView.swift 的新视图。
123456789101112131415161718192021222324252627282930313233343536373839404142434445464748495051525354555657585960616263646566676869707172737475767778798081828384858687888990919293949596import SwiftUIstruct ProfileView: View { @State var username = "" @State var fullName = "" @State var website = "" @State var isLoading = false var body: some View { NavigationStack { Form { Section { TextField("用户名", text: $username) .textContentType(.username) .textInputAutocapitalization(.never) TextField("全名", text: $fullName) .textContentType(.name) TextField("网站", text: $website) .textContentType(.URL) .textInputAutocapitalization(.never) } Section { Button("更新资料") { updateProfileButtonTapped() } .bold() if isLoading { ProgressView() } } } .navigationTitle("个人资料") .toolbar(content: { ToolbarItem(placement: .topBarLeading){ Button("退出登录", role: .destructive) { Task { try? await supabase.auth.signOut() } } } }) } .task { await getInitialProfile() } } func getInitialProfile() async { do { let currentUser = try await supabase.auth.session.user let profile: Profile = try await supabase .from("profiles") .select() .eq("id", value: currentUser.id) .single() .execute() .value self.username = profile.username ?? "" self.fullName = profile.fullName ?? "" self.website = profile.website ?? "" } catch { debugPrint(error) } } func updateProfileButtonTapped() { Task { isLoading = true defer { isLoading = false } do { let currentUser = try await supabase.auth.session.user try await supabase .from("profiles") .update( UpdateProfileParams( username: username, fullName: fullName, website: website ) ) .eq("id", value: currentUser.id) .execute() } catch { debugPrint(error) } } }}模型
在 ProfileView.swift 中,您使用了两种模型类型来反序列化响应和序列化请求到 Supabase。将这些模型添加到一个新的 Models.swift 文件中。
1234567891011121314151617181920212223struct Profile: Decodable { let username: String? let fullName: String? let website: String? enum CodingKeys: String, CodingKey { case username case fullName = "full_name" case website }}struct UpdateProfileParams: Encodable { let username: String let fullName: String let website: String enum CodingKeys: String, CodingKey { case username case fullName = "full_name" case website }}启动应用
现在您已经创建了所有视图,为应用程序添加一个入口点。这将验证用户是否具有有效会话,并将他们路由到已认证或未认证状态。
添加一个新的 AppView.swift 文件。
12345678910111213141516171819202122import SwiftUIstruct AppView: View { @State var isAuthenticated = false var body: some View { Group { if isAuthenticated { ProfileView() } else { AuthView() } } .task { for await state in supabase.auth.authStateChanges { if [.initialSession, .signedIn, .signedOut].contains(state.event) { isAuthenticated = state.session != nil } } } }}将入口点更新为新创建的 AppView。在 Xcode 中运行以在模拟器中启动您的应用程序。
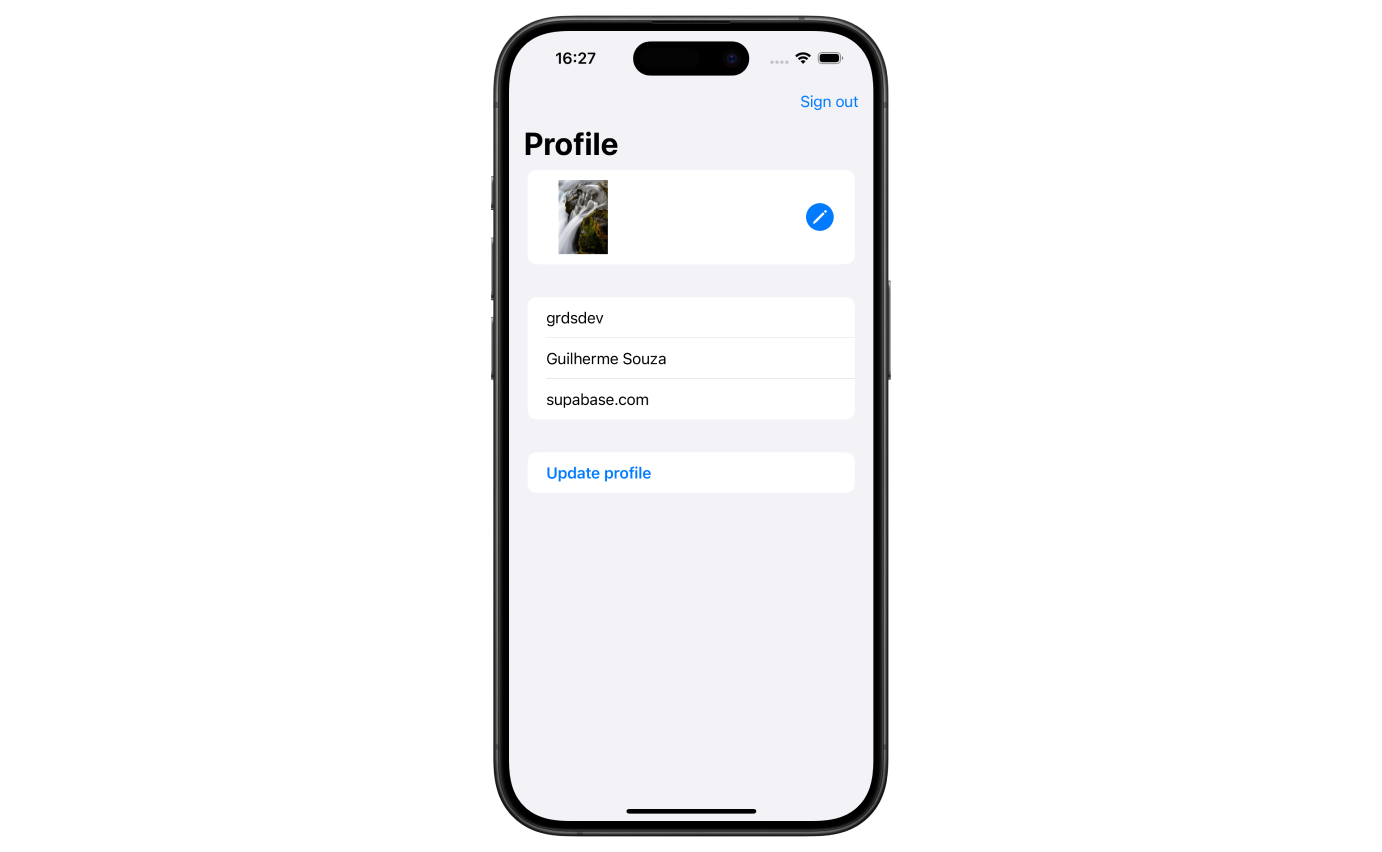
附加功能:个人资料照片
每个 Supabase 项目都配置了存储功能,用于管理大型文件如照片和视频。
添加 PhotosPicker
让我们添加支持用户从相册选择图片并上传的功能。首先创建一个新类型来保存选择的头像图片:
12345678910111213141516171819202122232425262728293031import SwiftUIstruct AvatarImage: Transferable, Equatable { let image: Image let data: Data static var transferRepresentation: some TransferRepresentation { DataRepresentation(importedContentType: .image) { data in guard let image = AvatarImage(data: data) else { throw TransferError.importFailed } return image } }}extension AvatarImage { init?(data: Data) { guard let uiImage = UIImage(data: data) else { return nil } let image = Image(uiImage: uiImage) self.init(image: image, data: data) }}enum TransferError: Error { case importFailed}在个人资料页面添加 PhotosPicker
123456789101112131415161718192021222324252627282930313233343536373839404142434445464748495051525354555657585960616263646566676869707172737475767778798081828384858687888990919293949596979899100101102103104105106107108109110111112113114115116117118119120121122123124125126127128129130131132133134135136137138139140141142143144145146147148149150151152153154155156157158159160161162163164165166167import PhotosUIimport Storageimport Supabaseimport SwiftUIstruct ProfileView: View { @State var username = "" @State var fullName = "" @State var website = "" @State var isLoading = false @State var imageSelection: PhotosPickerItem? @State var avatarImage: AvatarImage? var body: some View { NavigationStack { Form { Section { HStack { Group { if let avatarImage { avatarImage.image.resizable() } else { Color.clear } } .scaledToFit() .frame(width: 80, height: 80) Spacer() PhotosPicker(selection: $imageSelection, matching: .images) { Image(systemName: "pencil.circle.fill") .symbolRenderingMode(.multicolor) .font(.system(size: 30)) .foregroundColor(.accentColor) } } } Section { TextField("用户名", text: $username) .textContentType(.username) .textInputAutocapitalization(.never) TextField("全名", text: $fullName) .textContentType(.name) TextField("网站", text: $website) .textContentType(.URL) .textInputAutocapitalization(.never) } Section { Button("更新资料") { updateProfileButtonTapped() } .bold() if isLoading { ProgressView() } } } .navigationTitle("个人资料") .toolbar(content: { ToolbarItem { Button("退出登录", role: .destructive) { Task { try? await supabase.auth.signOut() } } } }) .onChange(of: imageSelection) { _, newValue in guard let newValue else { return } loadTransferable(from: newValue) } } .task { await getInitialProfile() } } func getInitialProfile() async { do { let currentUser = try await supabase.auth.session.user let profile: Profile = try await supabase .from("profiles") .select() .eq("id", value: currentUser.id) .single() .execute() .value username = profile.username ?? "" fullName = profile.fullName ?? "" website = profile.website ?? "" if let avatarURL = profile.avatarURL, !avatarURL.isEmpty { try await downloadImage(path: avatarURL) } } catch { debugPrint(error) } } func updateProfileButtonTapped() { Task { isLoading = true defer { isLoading = false } do { let imageURL = try await uploadImage() let currentUser = try await supabase.auth.session.user let updatedProfile = Profile( username: username, fullName: fullName, website: website, avatarURL: imageURL ) try await supabase .from("profiles") .update(updatedProfile) .eq("id", value: currentUser.id) .execute() } catch { debugPrint(error) } } } private func loadTransferable(from imageSelection: PhotosPickerItem) { Task { do { avatarImage = try await imageSelection.loadTransferable(type: AvatarImage.self) } catch { debugPrint(error) } } } private func downloadImage(path: String) async throws { let data = try await supabase.storage.from("avatars").download(path: path) avatarImage = AvatarImage(data: data) } private func uploadImage() async throws -> String? { guard let data = avatarImage?.data else { return nil } let filePath = "\(UUID().uuidString).jpeg" try await supabase.storage .from("avatars") .upload( filePath, data: data, options: FileOptions(contentType: "image/jpeg") ) return filePath }}最后,更新您的模型。
12345678910111213struct Profile: Codable { let username: String? let fullName: String? let website: String? let avatarURL: String? enum CodingKeys: String, CodingKey { case username case fullName = "full_name" case website case avatarURL = "avatar_url" }}您不再需要 UpdateProfileParams 结构体,因为现在可以复用 Profile 结构体进行请求和响应调用。
至此,您已经拥有一个功能完整的应用程序!